

RMX-1000, the field manual
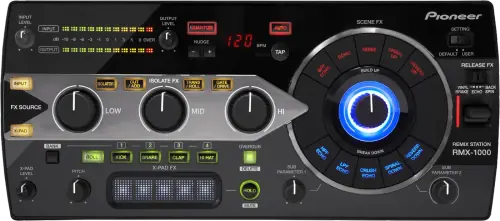
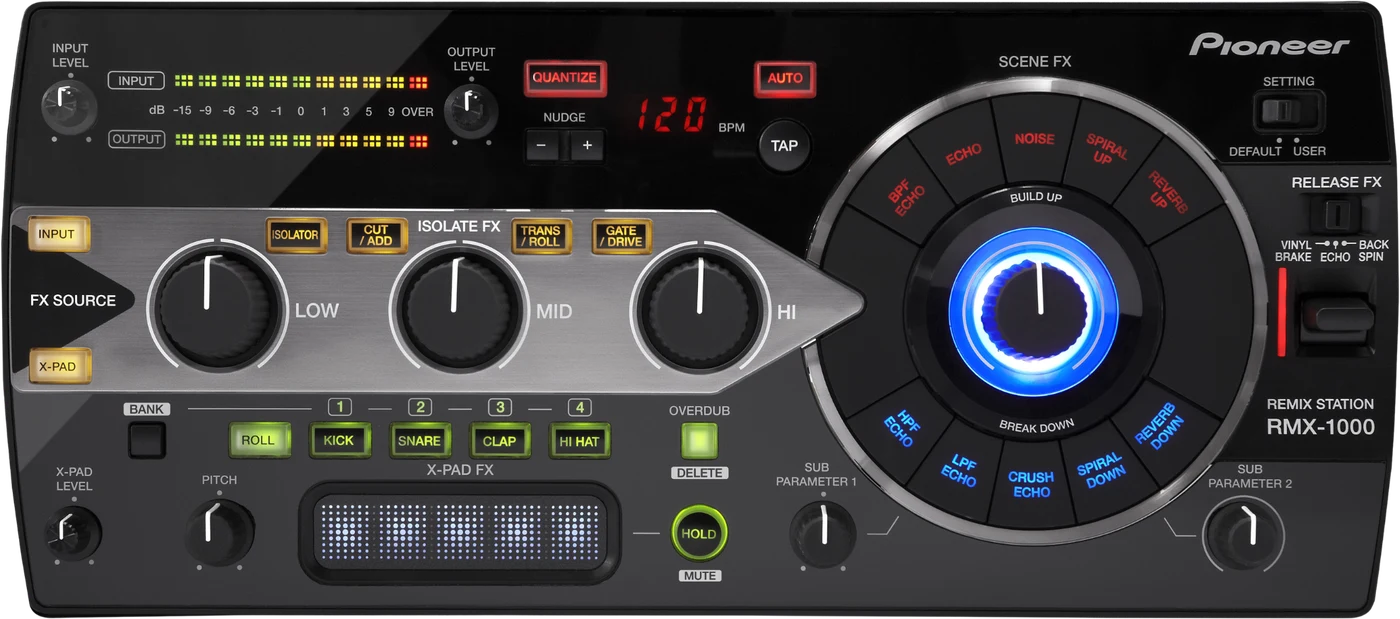
Booth briefing. The first question is how it is connected. The RMX-1000 has two switch positions, SEND/RETURN at -10 dB and MASTER at +4 dB, and the manual shows three wirings: a mixer's SEND and RETURN terminals, a DJ player into the unit and on into the mixer, or the mixer's MASTER OUT on the way to the amplifier. The first two both use the -10 dB position. The mode is a switch and the wiring is a patch, set separately, so check the switch against the cabling first. One wiring is forbidden: the unit's output must never come back to anything on that mixer other than its RETURN terminals.
Fast Lane
The five things that decide your gig
The five things on the RMX-1000 that change what happens next, if you are reading this in the booth. All five are explained in full further down this page.
Two switch positions at two levels, and three official ways to wire it: a mixer’s SEND and RETURN terminals, between a DJ player and the DJ mixer, or the mixer’s MASTER OUT terminals.
The mode is a switch and the wiring is a patch, set separately, so a unit patched one way and switched the other runs at the wrong gain level.
One wiring is forbidden outright: "Connecting the output from a DJ mixer’s [SEND] terminals to this unit’s input terminals then inputting this unit’s output to input terminals other than the [RETURN] terminals on the same DJ mixer."
The firmware history documents five repaired faults, and 2.11 is the one that can silence you mid-set.
The official note for that version reads "Fixed a rare issue where no sound would be output when ECHO is selected from SCENE FX."
So the version on the unit is worth reading, on a box that may have gone untouched since 2012.
The effects doing nothing is usually the FX SOURCE buttons, not a fault.
The manual's first move is two indicators: "Check that the [INPUT] and [X-PAD] buttons are lit. If the [INPUT] and [X-PAD] buttons are not lit, press the buttons to light them."
One scene ignores those buttons entirely, so a section that still makes noise is not proof the rest is broken.
Letting the Release FX lever go turns off everything else you had running.
The manual states it plainly: "When the lever is moved back to its original position, the effect turns off. Any SCENE FX, ISOLATE FX or X-PAD FX effects that were on before are also turned off."
A unit prepared in remixbox can be set to keep them, so the behaviour is not identical on every box.
The X-PAD plays off the card, and the card has a ceiling: 4BANK x 4SLOT, 16 seconds a bank.
The unit takes 48 kHz/24-bit or 48 kHz/16-bit WAV files, and the manual is blunt about the slot: "Do not forcibly insert or remove SD memory cards. Doing so could damage the SD memory card or this unit."
No card means no loaded samples, which is not a fault and is not obvious from the panel.
If something goes wrong
The effects are not doing anything
Short answer. The RMX-1000 only feeds its effect sections while the FX SOURCE buttons are lit, and that is the manual's first check: "Check that the [INPUT] and [X-PAD] buttons are lit. If the [INPUT] and [X-PAD] buttons are not lit, press the buttons to light them." Input routes the incoming signal into Scene FX, Isolator FX and Release FX, X-PAD routes the internally generated sound, and both can be lit at once.
Why this happens. They are buttons with a state, and the state survives the last user. Nothing about a dark Input button reads as a fault, because the unit keeps passing audio while doing nothing to it, which is exactly what a bypassed effector looks like.
Then check the control positions. The manual's table is specific about which control is at fault for which section. Scene FX not applying means the Scene FX control is not turned clockwise. Isolator FX not applying means the band control sits at centre. The X-PAD FX sound not appearing means the X-PAD LEVEL control needs turning clockwise. None of those is a fault and all three are one movement.
The one that still makes noise. If a scene is producing sound while the rest is silent, that is expected rather than strange: "The [NOISE] effect in the SCENE FX section is applied regardless of the status of the [INPUT] and [X-PAD] buttons." It is generated inside the unit, so it does not need the source buttons at all.
Avoid it next time. Add the two FX SOURCE buttons to your first glance, next to the CONNECTION switch. Lit buttons, switch against wiring, then levels.
The switch does not match the patch
Short answer. The RMX-1000 does not detect which way it is wired, so follow the cables and then set the rear CONNECTION switch to match what you find. Its two positions are SEND/RETURN at -10 dB for a mixer send and return loop or a DJ player’s audio output, or MASTER at +4 dB inline between the mixer master out and the amplifier.
Why this happens. Because the level is chosen on a switch rather than by the sockets, an installer, a previous DJ or a rental prep can leave the switch on the wrong side of the wiring, and the unit then runs at the wrong gain level for the signal it is actually being fed. There are three wirings to find, not two: a mixer’s SEND and RETURN terminals, between a DJ player and the DJ mixer, or the mixer’s MASTER OUT terminals.
Fix it now. Trace where the input cables come from. If they come from the mixer's send, or from a DJ player's audio output, the switch belongs on SEND/RETURN. If they come from the mixer's master out on the way to the amplifier, it belongs on MASTER. Set it, then re-check your levels against the target the manual gives: "Adjust the [OUTPUT LEVEL] control so that the [OUTPUT] level indicator lights up to about [0 dB] at the peak level." On the way in, the [INPUT] level indicator lights when sound is properly being input to this unit.
Check the return leg too. One wiring is ruled out outright: "Connecting the output from a DJ mixer’s [SEND] terminals to this unit’s input terminals then inputting this unit’s output to input terminals other than the [RETURN] terminals on the same DJ mixer." If the desk's return is already in use and somebody has landed the unit's output on a spare line input instead, that is not a workaround, it is the configuration the manual warns can produce oscillation and damage speakers.
Avoid it next time. Make the CONNECTION switch part of your first glance at the unit, the same way you check a channel's input selector on a mixer. It is one switch and it decides the level of everything passing through the box.
The BPM is flashing, or the number is wrong
Short answer. Auto BPM on the RMX-1000 depends on a level you have to set yourself, which the flashing display does not tell you. The manual's cause for a BPM it cannot measure, or a number that is obviously wrong, is an input level that is too high or too low, and the target it gives is the INPUT level indicator lighting to about 0 dB at the peak. Set that before you reach for TAP, because a badly set input makes every reading unreliable rather than just the one that flashed.
When the numbers disagree. A BPM on the RMX-1000 that does not match the number on the CD, the player, the mixer or the software is not a fault in any of them. The manual states plainly that the values may differ slightly because of the different ways BPM is measured. Pick the one the effect is obeying, which here is the RMX's own reading, and stop reconciling the rest.
Fix it now. Set the input first, against the 0 dB peak target. Then, if the display still flashes, use TAP and stop waiting for it to catch up.
The SD card is not recognised
Short answer. SD memory cards have a front and a back, and the RMX-1000 manual says so explicitly rather than leaving it to the slot. A card in the wrong way round reads as a card the unit will not recognise, which sends people looking at the card's format and capacity instead of at its orientation. It also asks that cards are never forced in or out, because that damages the card or the unit.
Then the other three checks. The manual gives three more before you suspect the unit: that only SD and SDHC cards conforming to SD standards work here and some cards will simply not be usable, that a card holding many folders or files takes time to load, and that a card carrying anything other than setting files and sampled data takes longer still. A card that seems slow at soundcheck is usually a card carrying a music library it does not need.
Fix it now. Orientation, then push it fully home, then try a different card. Keep a small dedicated card for this unit rather than reusing a camera card.
The MIDI mode names do not match your notes
Short answer. The RMX-1000 you are holding is probably on a different firmware generation, not faulty. The official note for version 2.01 is "In line with the firmware update of RMX-1000 Plug-in, the MIDI button type names and the MIDI messages are changed." It names no replacement labels, and the operating instructions document the MIDI button type as tGL (toggle) or trG (trigger), so read what the unit shows rather than trusting a list.
Where the setting lives. The MIDI settings are a power-on mode, reached by turning the power on while pressing the [QUANTIZE] button. Nudge selects, Tap enters, Auto cancels, and the item appears on the BPM display. From the factory the unit is set to MIDI channel 1 with the MIDI button type set to tGL (toggle), and any of channels 1 to 16 can be selected.
The setting that quietly disappears. The channel can also be changed on the fly with Bank held down and Nudge, and that one does not stick: "The MIDI channel changed in this way is reflected on this unit until the power is turned off." A mapping that worked yesterday and not this gig may simply have lost a temporary channel.
Why this happens. The RMX-1000 shipped in 2012 and many units have never been updated, so two of them met in the same year can present different MIDI mode names for the same functions. A guide, a mapping or your own notes written against one generation will not match a unit on the other, and a MIDI mapping built around the old map can behave differently against the revised one.
Fix it now. Read the version off the unit rather than guessing from labels: turning the power on while pressing the [HOLD (MUTE)] and [TAP] buttons, which starts the unit in updating mode and shows the installed firmware version number on the BPM display. Then pick the button type by function rather than by the label you memorised, and if a mapping misbehaves, suspect the message map revision before you suspect your controller or your software. If a sequencer will not follow the unit, the manual's answer is on the sequencer: set the MIDI sequencer’s sync mode to Slave, and note that MIDI sequencers not supporting MIDI timing clocks cannot be synchronized.
Avoid it next time. If you drive the plug-in or a MIDI mapping from an RMX-1000, note the firmware version of the unit you built it on, and check the version of any unit you meet before you rely on the mapping. This is the one place on this unit where firmware genuinely matters.
It behaves strangely and you suspect the firmware
Short answer. The RMX-1000 has a real firmware record behind it, so read the version before you rule the idea out. Five documented fixes sit in that history, and the one to know is 2.11: "Fixed a rare issue where no sound would be output when ECHO is selected from SCENE FX."
Why this happens. The top of the change history is empty. The last entry, 2.20 of 27 November 2018, says only "Improved stability", so a quick look at the top line suggests there is nothing to gain. The fixes are further down, in 2.11, 2.10, 1.31, 1.20 and 1.19, and a 2012 unit in a rental fleet may never have moved past any of them.
Fix it now, in order. First the physical layer, because it is faster and it is more often the answer: the CONNECTION switch against the wiring, the connections themselves, the FX SOURCE buttons, and the SD card, because a unit can be carrying a previous owner's samples and remixbox parameters and behaving exactly as that person configured it. Then read the version: turning the power on while pressing the [HOLD (MUTE)] and [TAP] buttons, which starts the unit in updating mode and shows the installed firmware version number on the BPM display.
The manual's own reset, and when not to use it. "The player may not operate properly due to static electricity or other external influences. In such cases, normal operation may be restored by unplugging the power cord then plugging it back in." That works, and on a unit sitting inline on the master it also takes the room with it, because the sound will be interrupted if the AC adapter’s power cord is disconnected from the unit during playback. Save it for a gap, not for the middle of a track. If you do update, the one hard rule is "Do not turn off this unit’s power during the updating procedure."
Avoid it next time. Note the version of any RMX-1000 you rely on. On a unit that has lived in rentals and installs, what it inherited and what it was never updated to are both live questions.
What to watch for
What the firmware history documents
Short answer. The official change history documents five repaired faults, and one of them is silence. Version 2.11 of 10 June 2013 records "Fixed a rare issue where no sound would be output when ECHO is selected from SCENE FX." That is a no-sound condition on a Scene FX selection, which is a mid-set failure rather than a nuisance. Checked 10 August 2026.
The other four. Version 2.10 of 7 February 2013 fixed an output level that dropped when the unit was used as a USB audio interface. Version 1.31 of 25 July 2012 fixed Spiral Up and Spiral Down becoming excessively loud, and fixed Quantize when it was used with Overdub. Version 1.20 of 24 May 2012 fixed slight noise a user could rarely hear on the output. Version 1.19 of 25 April 2012 corrected sending and receiving MIDI signals with the plug-in.
The top of the record is quiet, which is what misleads. The last published entry, 2.20 of 27 November 2018, says only "Improved stability". Reading the top line alone tells you nothing happened. Reading the whole history tells you five things did.
The entry that changes behaviour rather than fixing anything. Version 2.01 of 29 November 2012 records "In line with the firmware update of RMX-1000 Plug-in, the MIDI button type names and the MIDI messages are changed." It names no new labels, and the operating instructions still document the MIDI button type as tGL (toggle) or trG (trigger). What it does mean is that a MIDI mapping built against a pre-2.01 unit was built against a different message map.
Do this. Read the version on the unit before you assume anything, because on a 2012 box that has lived in rentals it is genuinely unknown. Reading it is a power-on move: turning the power on while pressing the [HOLD (MUTE)] and [TAP] buttons, which starts the unit in updating mode and shows the installed firmware version number on the BPM display. Back out without inserting a card if all you wanted was the number.
Official documentation. Firmware history and update →
Official product page, archived →
Found an entry we have missed? Tell us and we will add it.
The unit in front of you has a past
Short answer. The RMX-1000 was announced on 16 March 2012 and went on sale in June 2012, and it is now archived on the official site. A unit you meet today is a rental or an install veteran, and it carries whatever its life gave it.
Why it matters. Five things on this unit persist between users, and none of them resets itself. The CONNECTION switch. The selected Isolator FX and Scene FX types. The FX SOURCE buttons. The rear SETTING switch, where DEFAULT runs the parameter data set at the factory and USER runs parameter data created in remixbox. And the card, or the absence of one. The honest assumption is that all five are set for the previous user, not for you.
The one you cannot see. Parameters synced into the unit over USB live inside it with no card present, and the factory state is only a default: "Upon shipment from the factory, the same parameter data as for the [DEFAULT] mode is set for the [USER] mode." So a unit on USER with an empty slot is not necessarily a stock unit. Moving the switch to DEFAULT is the way back to the factory parameter set.
Do this. A thirty second pass at soundcheck: CONNECTION switch against wiring, SETTING switch where you want it, effect types where you want them, FX SOURCE buttons lit, and your own card in the slot if you brought one. If you rely on the plug-in or MIDI, read the firmware version too: turning the power on while pressing the [HOLD (MUTE)] and [TAP] buttons, which starts the unit in updating mode and shows the installed firmware version number on the BPM display.
Compatibility
What it connects to
Short answer. The manual shows three wirings: a mixer’s SEND and RETURN terminals, between a DJ player and the DJ mixer, or the mixer’s MASTER OUT terminals. The rear switch has two positions and matches the level to the wiring: SEND/RETURN at -10 dB for a mixer send and return loop or a DJ player’s audio output, or MASTER at +4 dB inline between the mixer master out and the amplifier. The send and return loop and the DJ player path both sit on the -10 dB position. It is deliberately mixer-agnostic: nothing about any of the three requires a particular brand or model of desk.
The wiring the manual rules out. "Interconnect the equipment in such a way that the flow of the audio signals does not loop. If looped connections are made, the circuitry could produce oscillations that may damage the speakers, etc." The example that catches DJs is the send and return one: "Connecting the output from a DJ mixer’s [SEND] terminals to this unit’s input terminals then inputting this unit’s output to input terminals other than the [RETURN] terminals on the same DJ mixer." If the loop is occupied and you are tempted to return the unit somewhere else on the same desk, that is the move the manual forbids.
Sockets and cables. Input and output are each a set of RCA pin jacks and a set of quarter-inch phone jacks, and the manual sets one rule for them: "When connecting audio cables, only connect either RCA pin jacks or phone jacks, not both." A mono source is handled for you, since when only [L (MONO)] is connected, the sound input to [L (MONO)] is also input to [R].
No PRO DJ LINK. The RMX-1000 has no network connection, so no BPM or grid information arrives from players or from a mixer. Auto BPM reads the tempo from the audio itself, and that reading is what Quantize and the X-Pad obey.
The software side. The unit ships with the remixbox editor, and the RMX-1000 Plug-in for VST, Audio Units and RTAS hosts. The hardware drives the plug-in in controller mode over USB, and remixbox prepares the card that carries custom samples and parameters to the hardware, with one restriction on that link: "A USB hub cannot be used."
Do this. If you plan to bring one to this gig, the question for the venue is whether the mixer has a free send and return loop, and if not, whether you are allowed into the master chain or onto a single player's output. The master chain is the bigger ask, and it is the technical manager's call rather than yours.
Features explained
Isolator FX, three bands under your left hand
Short answer. Three large knobs, one per high, mid and low band, running one of four effect types: ISOLATOR, CUT/ADD, TRANS/ROLL and GATE/DRIVE. Three of the four are pairs, so turning one way gives the first effect and the other way gives the second. With a control at centre the effect is not applied and only the original sound is output.
Why it matters. This is a band tool that goes further than an isolator on a mixer: ISOLATOR is level per band, but Trans/Roll, Gate/Drive and the Add side of Cut/Add put a rhythmic, a distortion or a delayed effect on a single band of the incoming signal. It is the section that made the RMX-1000 feel like an instrument rather than an effects loop. Roll is a recorder rather than a filter: it records from the moment the knob is turned and repeats what it caught.
The one that is not a pair. ISOLATOR is a plain three-band level control, and the unit remembers which of the four types is selected. A knob you expect to cut the low end can be sitting on GATE/DRIVE instead.
When professionals use it. Continuously and gently. The pair selection is the decision to make before the moment, not during it, because a knob you expected to cut the low end and which is switched to Gate/Drive does something very different to a big system.
Common mistakes. Not checking which of the four types is selected before the first move. On a shared or rental unit the buttons sit wherever the last user left them. A second mistake is expecting the effect to be applied with the knobs centred, which is exactly the position at which it is not.
Scene FX and Release FX, the build and the exit
Short answer. The unit carries 10 Scene FX types: BPF ECHO, ECHO, NOISE, SPIRAL UP, REVERB UP, HPF ECHO, LPF ECHO, CRUSH ECHO, SPIRAL DOWN and REVERB DOWN. One large control runs the selected scene, and two sub parameter controls shape it. Release FX is the exit, on a lever with three positions: Back Spin, Echo, Vinyl Brake.
The lever takes everything with it. Pulling the lever towards you drops the original sound and leaves only the effect. Moving it back is the part to know about: "When the lever is moved back to its original position, the effect turns off. Any SCENE FX, ISOLATE FX or X-PAD FX effects that were on before are also turned off." So a release does not just end itself, it clears the Scene FX or Isolator move you had running underneath.
Why it matters. Scene FX is the section that structures a transition rather than decorating it, a build or a breakdown as one gesture. Release FX is the part DJs underrate: it is designed to get you out of an effect cleanly, so the return to the dry track is part of the move instead of an afterthought.
When professionals use it. Rehearsed, in pairs: one scene in, one release out, with the knowledge that the release wipes the board. remixbox can change that, because it can select individually whether or not the SCENE FX, ISOLATE FX and X-PAD FX effects continue when RELEASE FX is turned off, so a prepared unit and a stock unit do not behave the same way.
One scene ignores the source buttons. Noise is generated inside the unit, and "The [NOISE] effect in the SCENE FX section is applied regardless of the status of the [INPUT] and [X-PAD] buttons." That is worth knowing when nothing else is responding.
Common mistakes. Riding a build up scene with no plan for the exit, and being surprised when the lever coming home takes the rest of the board with it.
The X-Pad, Quantize and Auto BPM
Short answer. A touchpad and four buttons playing Kick, Snare, Clap and Hi-Hat drum samples with pitch control and sample roll. Quantize ties the cycle and timing of the X-PAD FX section to the track, and Auto BPM reads that tempo from the incoming audio. Touching the pad turns the effect on and the effect turns off when you release your finger from the [X-PAD], unless Hold is engaged, which keeps the effect where your finger left it.
What Quantize does not do. It does not put the drum buttons on the grid: "The one-shot sound produced when the [KICK], [SNARE], [CLAP] or [HI HAT] button is pressed is produced immediately, regardless of whether the QUANTIZE function is on or off." Quantize governs the cycle and timing of the X-PAD FX section, and the Nudge buttons fine adjust that cycle in either direction. If you expected the pads to be corrected, they never were.
Auto BPM has a range and a tell. The unit measures 70 to 180 in Auto, and the [AUTO] mode is set when this unit’s power is turned on. When it cannot read the track, "If the BPM cannot be measured, the BPM value on the display flashes. In such cases, use the [TAP] button to input the BPM manually." A flashing BPM display is the panel telling you the number is stale, which is worth more than any guess about drift.
The card and the banks. The unit takes only SD memory cards or SDHC memory cards conforming to SD standards. Sampled sources load from the card in 4BANK x 4SLOT, held to the buttons by pressing an X-PAD FX button while holding Bank, and "The maximum length of the sampled sounds that can be set in the BANK (the total for the 4SLOT) is 16 seconds." The supported format is 48 kHz/24-bit or 48 kHz/16-bit WAV files, prepared in remixbox.
When professionals use it. As punctuation, a clap roll into a drop, a kick under an acappella, rather than as a second drummer. Pitch control means the loaded sources can be tuned to the track instead of fighting it.
Common mistakes. Trusting Auto BPM without glancing at the display, and forgetting what Overdub throws away. Turning Overdub off stops playback and recording and erases the recorded sound, and "Deleted sounds cannot be retrieved."
remixbox, the plug-in and the SD card
Short answer. The software side is the remixbox editor, and the RMX-1000 Plug-in for VST, Audio Units and RTAS hosts. remixbox edits the effect parameters and loads custom X-Pad samples, and the results reach the unit two ways: over USB into the unit's own memory, or on an SD card. The rear SETTING switch chooses which parameter set plays, because DEFAULT runs the parameter data set at the factory and USER runs parameter data created in remixbox.
Where the settings actually live. This is the part that surprises people. Parameters synced over USB stay in the unit with no card present, and "Upon shipment from the factory, the same parameter data as for the [DEFAULT] mode is set for the [USER] mode." On a card the behaviour is different again: "Customized parameter data stored on an SD memory card is reflected on this unit simply by inserting that SD memory card into this unit." Samples are the exception, in that they play from the card with the switch on either side.
Two things remixbox can change that look like faults. It sets the sensitivity of the Scene FX and Isolator FX buttons, and it carries an accidental operation lock: "When the accidental operation prevention function is enabled, effects can be turned on and off by pressing and holding the effect type selection buttons on the RMX-1000." A unit that will not respond to a normal press may simply have been prepared that way.
The USB rules. One topology is allowed: "A USB hub cannot be used." Connect the unit and the computer directly with the supplied cable. And while that cable is in, the sampler is not yours to play: "To play sampled sound sources on an SD memory card inserted into the RMX-1000 using the RMX-1000’s X-PAD FX section, disconnect the USB cable connecting the RMX-1000 and computer."
When professionals use it. Prepare the card at home in remixbox, carry it with your headphones, and load it at soundcheck. Unlock the card before you leave, because "SD memory cards include a lock mechanism. Be sure to unlock it when using the SD memory card."
Common mistakes. Assuming the samples on an installed unit are the stock ones, and assuming that pulling the card returns the unit to factory behaviour. It does not, if somebody synced parameters into it over USB and left the switch on USER.
Professional tips
Ask how it is patched, before you plan around it
Short answer. One question to the technical manager: is the RMX-1000 in the send and return loop, on a single player's output, or inline on the master. The answer changes what the unit can do for you and how far a mistake on it travels.
Why it matters. In a send and return loop the unit processes what the mixer sends it, and the mixer's own controls decide how much of that reaches the room. On one player's output it touches that deck alone. Inline on the master, everything the room hears passes through the unit for the whole set, which makes it more powerful and less forgiving in equal measure. Those are the three official wirings: a mixer’s SEND and RETURN terminals, between a DJ player and the DJ mixer, or the mixer’s MASTER OUT terminals.
The power question follows from the answer. The unit documents no bypass path with the power off, and it documents the opposite: the sound will be interrupted if the AC adapter’s power cord is disconnected from the unit during playback. That is why the rear panel carries a cord hook. The manual's instruction is plain: "Hook the AC adapter’s power cord onto the cord hook to fasten it in place. This prevents the power cord from being accidentally pulled, causing the plug to get disconnected from the terminal." Inline on the master, that hook is protecting the room.
Do this. Ask at the booking or at load in, confirm the CONNECTION switch matches the answer, check the cord is on the hook, and rehearse your moves for the configuration you will actually have rather than the one you practised on.
Preventive maintenance
Keeping a 2012 unit reliable
Short answer. Connector care, switch care, the cord hook, and the card slot. Three of those four are the manual's own instructions rather than general advice.
The card slot, in the manual's words. "Do not forcibly insert or remove SD memory cards. Doing so could damage the SD memory card or this unit." Nothing else belongs in it either, and loading time is a symptom worth recognising: "If the folder contains files other than setting files and sampled data, some time will be required for loading. Do not put files other than setting files and sampled data in the folder." A card that seems slow at soundcheck is usually a card carrying a music library it does not need.
The cord hook is not decoration. "Hook the AC adapter’s power cord onto the cord hook to fasten it in place. This prevents the power cord from being accidentally pulled, causing the plug to get disconnected from the terminal." On a unit inline on the master, that is the difference between a stumble and silence, because the sound will be interrupted if the AC adapter’s power cord is disconnected from the unit during playback.
Why it matters. On a unit this age the failure points are mechanical: strained jacks, switches that have been worked for a decade, and an SD slot fed with whatever card was nearest. An intermittent connection on a box that sits inline on the master is a problem for the whole room, not for one channel.
Do this. Turn the power off and unplug the power cord before making or changing connections, which is the manual's own instruction, then connect the power cord last. Unplug by the connector rather than the cable, keep a known good card with your parameters on it, and keep the unit covered between gigs. If you own one and it is inline in your rig, test the whole chain after transporting it, before the audience arrives. Operating range is +5 °C to +35 °C at 5 % to 85 % relative humidity with no condensation, so a unit that has travelled cold deserves time in the room before you trust it.
Firmware, drivers and manuals
Official downloads and documents
Go to AlphaTheta for the files themselves. We link their pages instead of hosting a copy, because a manual copied here is a snapshot of release day and theirs is the one that stays current.
Firmware downloads. Official Pioneer DJ firmware page →
Manuals. Official Pioneer DJ manual page →
Broken link? Let us know and we'll fix it.
Frequently asked questions
Quick answers
- Does the RMX-1000 need firmware updates?
- Possibly, and the change history is worth reading rather than skimming. Five repaired faults are documented in it. The one that matters live is 2.11: "Fixed a rare issue where no sound would be output when ECHO is selected from SCENE FX." The others are 2.10, 1.31, 1.20 and 1.19. The last published entry, 2.20 of 27 November 2018, says only "Improved stability", which is why the record looks emptier than it is.
- How do I read the firmware version on the unit?
- By turning the power on while pressing the [HOLD (MUTE)] and [TAP] buttons, which starts the unit in updating mode and shows the installed firmware version number on the BPM display. If you only wanted the number, do not insert a card. If you are updating, the one hard rule is "Do not turn off this unit’s power during the updating procedure."
- Can I load my own samples?
- Yes. Custom X-Pad samples load from an SD card in the unit's slot, prepared in the remixbox editor, in 4BANK x 4SLOT. The format is 48 kHz/24-bit or 48 kHz/16-bit WAV files, and "The maximum length of the sampled sounds that can be set in the BANK (the total for the 4SLOT) is 16 seconds."
- Send and return, or inline, which is correct?
- Three wirings are official: a mixer’s SEND and RETURN terminals, between a DJ player and the DJ mixer, or the mixer’s MASTER OUT terminals. The rear switch sets the level to match: SEND/RETURN at -10 dB for a mixer send and return loop or a DJ player’s audio output, or MASTER at +4 dB inline between the mixer master out and the amplifier. What matters is that the switch matches the way the unit is actually wired.
- Is there a wiring the manual forbids?
- Yes. "Interconnect the equipment in such a way that the flow of the audio signals does not loop. If looped connections are made, the circuitry could produce oscillations that may damage the speakers, etc." The example that catches DJs is "Connecting the output from a DJ mixer’s [SEND] terminals to this unit’s input terminals then inputting this unit’s output to input terminals other than the [RETURN] terminals on the same DJ mixer."
- What happens if the RMX-1000 loses power mid-set?
- The manual documents no bypass or through path with the power off, and it does document the consequence: the sound will be interrupted if the AC adapter’s power cord is disconnected from the unit during playback. That is what the rear cord hook is for. Inline on the master out, the whole room is downstream of that cord.
- The effects are not doing anything. What first?
- The FX SOURCE buttons: "Check that the [INPUT] and [X-PAD] buttons are lit. If the [INPUT] and [X-PAD] buttons are not lit, press the buttons to light them." Then the control positions, since Scene FX needs its control turned clockwise, Isolator FX does nothing with the band controls at centre, and X-PAD FX needs X-PAD LEVEL turned clockwise. One scene ignores all of that: "The [NOISE] effect in the SCENE FX section is applied regardless of the status of the [INPUT] and [X-PAD] buttons."
- Does it work with any mixer?
- Any desk with a send and return loop, or inline on any master chain, or between a DJ player and the desk. None of the three is tied to a brand or model of mixer.
- What effects are on it?
- Isolator FX with ISOLATOR, CUT/ADD, TRANS/ROLL and GATE/DRIVE on high, mid and low bands, 10 Scene FX types, BPF ECHO, ECHO, NOISE, SPIRAL UP, REVERB UP, HPF ECHO, LPF ECHO, CRUSH ECHO, SPIRAL DOWN and REVERB DOWN, Release FX of Back Spin, Echo, Vinyl Brake, and the X-Pad with Kick, Snare, Clap and Hi-Hat drum samples with pitch control and sample roll, plus Quantize and Auto BPM.
- Does Quantize put the drum buttons on the grid?
- No. "The one-shot sound produced when the [KICK], [SNARE], [CLAP] or [HI HAT] button is pressed is produced immediately, regardless of whether the QUANTIZE function is on or off." Quantize governs the cycle and timing of the X-PAD FX section instead.
- Is it discontinued?
- It is archived on the official Pioneer DJ site, and no formal discontinuation notice exists, so this page says archived and nothing stronger. Its 2026 successor is the RMX IGNITE.
- Does it have PRO DJ LINK?
- No. It has no network connection, so tempo comes from Auto BPM reading the audio, over a range of 70 to 180. "If the BPM cannot be measured, the BPM value on the display flashes. In such cases, use the [TAP] button to input the BPM manually."
- Can I use it in the studio?
- Yes, through the remixbox editor, and the RMX-1000 Plug-in for VST, Audio Units and RTAS hosts. One restriction applies to the link: "A USB hub cannot be used." While the USB cable is connected, "To play sampled sound sources on an SD memory card inserted into the RMX-1000 using the RMX-1000’s X-PAD FX section, disconnect the USB cable connecting the RMX-1000 and computer."
- Why does my unit show different MIDI button type names than the guide I am reading?
- Firmware 2.01 changed them, and the official note is "In line with the firmware update of RMX-1000 Plug-in, the MIDI button type names and the MIDI messages are changed." It names no replacement labels. The operating instructions document the MIDI button type as tGL (toggle) or trG (trigger).
- How old is it, and how big?
- Announced 16 March 2012, on sale June 2012. The unit weighs 1.3 kg and measures 334 mm (W) x 57 mm (H) x 157 mm (D). A unit met today is a rental or an install veteran, so check the CONNECTION switch, the SETTING switch, the selected effect types and the card before you trust its state.
Where this sits in the line
- Next generation RMX IGNITE
Commonly paired with
What you usually find beside it in working booths, from club, festival and rental installs rather than from a manufacturer document.
Pioneer DJ All brands Knowledge base FAQ and Fixes Dictionary
Playing soon and it is not working?
Start Emergency ModeKeep the Emergency Card
We will email you the printable PDF so it is on your phone before the next dark booth. Occasional notes that save gigs. No spam, unsubscribe in one click.
Registering is free and counts everywhere on Save My Gig. We send a confirmation email first. Your address is stored with Brevo, our email provider. Unsubscribe any time. Privacy
Sources: the official Pioneer DJ RMX-1000 product page, which now lives under an archive path on the official site, the official firmware history and update page and the launch announcement of 16 March 2012, checked 10 August 2026. Specifications theirs, priorities ours.