Numark SCRATCH, the field manual
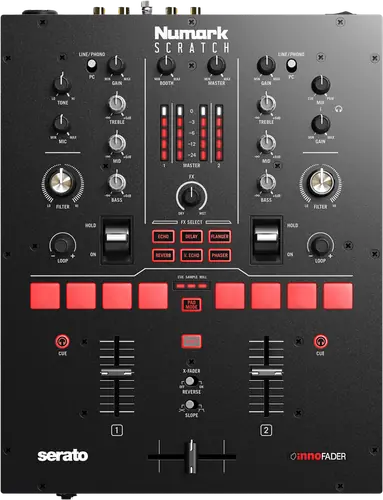
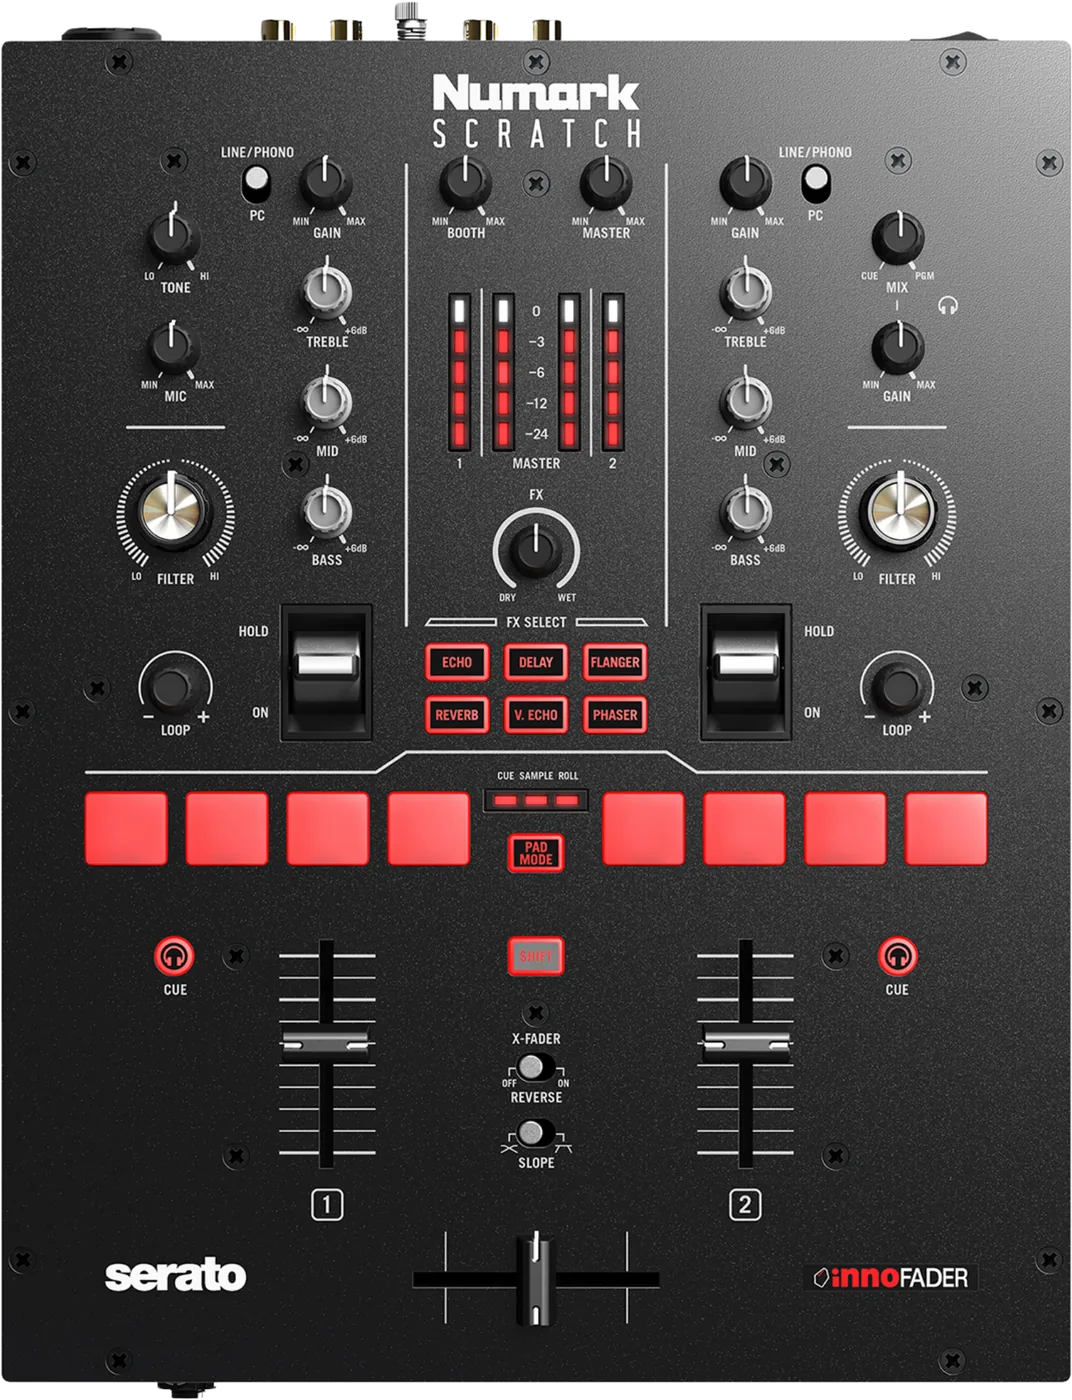
Booth briefing. The Numark SCRATCH is a two channel Serato DJ Pro battle mixer with DVS built in. Each turntable connects at the rear on a Line/Phono input and reaches Serato through that deck's Deck Input Selector: PC sends the control tone to the software for timecode, and Line/Phono passes the record itself into the mix. The crossfader has a Slope switch and an X-Fader Reverse switch, the two crossfader settings Numark document alongside the fader itself, which is the mixer's reason for being.
When it goes wrong: No sound from the mixer
Fast Lane
The five things that decide your gig
The five things on the Numark SCRATCH that change what happens next, if you are reading this in the booth. All five are explained in full further down this page.
For timecode the Deck Input Selector goes to PC, not Line/Phono.
For timecode, set that deck’s Deck Input Selector to PC. Numark state it in the DVS section, because with timecode the audio you want is the software the record is steering. The rear panel entry for the same turntable on the same input tells you to set the Deck Input Selector to Line/Phono, which is right when you want to hear the record itself. Both are correct in their own context and they sit pages apart with nothing linking them. Get it the wrong way round with a control record on the platter and the control tone goes to the PA, so this is the first switch to check when a DVS deck is silent or screaming.
The Line and Phono selector for that deck still has to match the device, the Serato DJ Pro channel you control is fixed by which physical input the turntable or CD player is plugged into, and Numark tell CD player users to disable all the player’s built in effects including keylock and master tempo.
Three things are published about the crossfader, and that is all of them.
The guide publishes three things about the crossfader and no more. The fader itself: move it to mix between the decks, which is the entire entry. A Slope switch, flipped left for a smooth fade and right for a sharp cut. And an X-Fader Reverse switch, which with Off puts Deck 1 on the left and Deck 2 on the right and with On swaps them. That is the complete published account of the crossfader on a mixer called Scratch.
The words cut-in and cut lag appear nowhere in the document in any language, and no cut-in adjustment is described. Neither is fader tension, fader type (magnetic, contactless, optical or carbon), a brand, a part number, a replacement procedure or whether the fader is user replaceable at all. The specification table has no crossfader row: no type, no travel, no life rating, no service interval. The NS6II guide, for a unit that is not a battle mixer, at least says its crossfader is user replaceable and roughly how to get at it.
The calibration procedure exists in a support article, not in the guide.
There is no crossfader calibration procedure in this guide. No calibration mode, no button combination, no service utility and no pointer to one, in any of the five languages. The words calibrate and calibration appear in the document only in the Serato DJ Pro DVS section, where they mean calibrating the software to a turntable or CD player. Numark do publish a separate support article about calibrating the Scratch crossfader, and the guide never mentions that it exists, so an owner working from the manual alone has no way to learn there is a procedure. Anything about how that procedure runs has to be taken from the support article and credited to it, never to this guide.
So if somebody hands you a fader calibration routine, ask where it came from. This site credits it to the support article, because that is the document that carries it.
Every published figure is in the English appendix and nowhere else.
The specification table is published in English only. There is no Spanish, French, Italian or German appendix, so a reader working from any of those four editions gets no output levels, no input levels, no impedances, no converter figures and no power information at all.
If you are filling in a rider or matching levels to a house system, the English edition is the only one that will help you do it.
Budget calibration time into every changeover, for each deck separately.
Numark state that Serato DJ Pro has to be calibrated to the turntable or CD player every time the equipment is set up, and separately for each deck. It is done with music playing at set volume from the other channel, aiming at a readable signal close to 85 percent and an RPM reading of 0.0 with the record stopped. That is real load in time on every gig, so budget for it in the changeover rather than discovering it there.
It is not a one time setup you do at home. Every load in needs it again, and it needs music playing at set volume from the other channel while you do it.
What to watch for
Where the five language editions differ, and which one to follow
The SCRATCH guide carries five languages in one PDF, and a few entries in the Spanish edition read differently from the rest. Where this site records a difference between the English and the Spanish of a Numark manual, it is recording a documentation slip and nothing more. One PDF carrying five languages is translated and laid out by different people under different deadlines, and the differences below are different in every document, which is what ordinary editing slips look like. None of it suggests a manufacturer trying to mislead anyone, and this site does not read it that way.
Pull the Effects Toggle DOWN and hold for a momentary effect, push it UP to latch it on, and the centre position is off. Numark give both directions in the English edition. The Spanish edition drops the word down from the momentary instruction, so a Spanish reading DJ has no printed way to tell the two directions apart before trying it live, and it also says to pull the toggle up where the English says push.
The Spanish edition of the first calibration step says to play the music at the highest volume possible and then, in the same sentence, as you would in a real performance. Use your set volume, which is what the English says and what the second half of the Spanish sentence says: calibrating the noise threshold against a louder room than you will play biases the threshold.
How many positions the Slope switch has, what a centre position would do and which setting Numark would recommend are all unstated. The Spanish edition describes it as a control you turn rather than a switch you flip, so set it and check it by ear: there is no printed reference point to come back to.
Only the Spanish edition says what the booth output carries. Its Booth Out entry adds the sentence about the program mix being sent to that output, and the English entry does not have it. The addition matches what the English says about both master outputs, and the two editions still do not say the same thing.
The appendix, and the four editions that do not have one
Every figure published for the SCRATCH sits in one appendix, and that appendix is in one language. The specification table is published in English only. There is no Spanish, French, Italian or German appendix, so a reader working from any of those four editions gets no output levels, no input levels, no impedances, no converter figures and no power information at all.
So the English document is the one to keep on the drive if levels, impedances or power figures are ever going to matter to you.
There is no firmware section in this guide
Nothing in the SCRATCH guide tells an owner that a firmware exists. The word firmware does not appear anywhere in this guide, in any of its five languages. There is no update procedure, no version number, no serial number range and no hardware revision, so nothing in the document can be dated to a release and nothing in it tells an owner that a firmware exists. The only version the document carries is its own, Manual Version 1.2.
Numark publish a support knowledge base with per-model articles, and on several points it answers what the manual does not. Coverage is uneven: the NS7 II, the NS7 III, the SCRATCH and the Mixstream family have articles, and no model-specific article could be found for the MixTrack Platinum FX, the MixTrack Pro FX or the NS6 II, checked 2026-09-06.
What the guide does not answer
On the SCRATCH the published record stops well short of the panel. The guide contains no troubleshooting section, beyond the grounding and noise threshold notes inside the DVS calibration steps. There is no safety or warranty text either: it is deferred to a separate Safety and Warranty manual.
None of the seven user guides states what the product is. There is no sentence in any of them calling the unit a controller, a mixer or a standalone system. The SCRATCH guide never uses the word mixer at all, and the NS6 II guide has no introduction section whatsoever.
None of the seven guides contains safety or warranty text. All seven defer it to a separate Safety and Warranty manual, so the document a DJ keeps is not the one carrying the warnings.
Compatibility
The software, the download card and the driver row
Serato DJ Pro, named consistently, with full installation walkthroughs for macOS and Windows. The download comes from a link on the Software Download Card in the box, and no serial number, licence key, activation or registration step appears anywhere in that walkthrough: the guide goes from download straight to launch. Whether the hardware unlocks Serato DJ Pro, whether the licence is included and whether anything has to be bought are not stated. No paid Serato expansion is named anywhere in the document.
The Software section gives no driver installation step for any platform. The only driver information in the whole document is one row of the specification table, naming ASIO and Windows Audio for PC and UAC2 class compliance on Mac with no additional driver needed. No download location for the ASIO driver is given, and there is no equivalent of the install the drivers first instruction that opens the NS6II guide.
Sort the SCRATCH software out before the gig rather than on the day, because the walkthrough goes from download straight to launch and never says whether a licence is included.
What Serato say, and both questions the guide leaves open
Serato answer both questions the guide leaves open. Their hardware page states this unit unlocks Serato DJ Pro for free when it is plugged into the software, so the licence is not a purchase.
And on timecode they state it unlocks Serato DVS so it can be used with turntables or CDJs. Nothing further has to be bought on top of the control records and CDs the guide describes.
Does it work without a computer?
The SCRATCH guide answers this in one clause and then stops. The guide states it once, in a single clause on the rear panel: the Line and Phono inputs allow you to mix audio from external devices without a computer, as well as to control the playhead in Serato DJ Pro. That is the whole of it. There is no standalone section, and which controls stay live with no computer attached is NOT STATED: the pads, the Loop Knob and the Software FX are all described as software functions, and whether the microphone works without a computer is not addressed.
So a turntable through the Line and Phono inputs will mix with no laptop attached. Whether the pads, the Loop Knob, the effects and the microphone come with it is a test to run at home rather than a promise to make to a client.
Features explained
The crossfader, and everything the guide publishes about it
The guide publishes three things about the crossfader and no more. The fader itself: move it to mix between the decks, which is the entire entry. A Slope switch, flipped left for a smooth fade and right for a sharp cut. And an X-Fader Reverse switch, which with Off puts Deck 1 on the left and Deck 2 on the right and with On swaps them. That is the complete published account of the crossfader on a mixer called Scratch.
There is no per channel crossfader assign on this unit and none is described. Deck 1 and Deck 2 sit on opposite sides of the crossfader, swappable only as a pair with X-Fader Reverse, and the guide gives no way to take a deck off the crossfader. Which way X-Fader Reverse ships is not stated.
The words cut-in and cut lag appear nowhere in the document in any language, and no cut-in adjustment is described. Neither is fader tension, fader type (magnetic, contactless, optical or carbon), a brand, a part number, a replacement procedure or whether the fader is user replaceable at all. The specification table has no crossfader row: no type, no travel, no life rating, no service interval. The NS6II guide, for a unit that is not a battle mixer, at least says its crossfader is user replaceable and roughly how to get at it.
None of that stops the SCRATCH being a good fader to play on. It means the answers a battle DJ wants live somewhere other than this document, and the next section says where.
The Deck Input Selector, and the position timecode needs
For timecode, set that deck’s Deck Input Selector to PC. Numark state it in the DVS section, because with timecode the audio you want is the software the record is steering. The rear panel entry for the same turntable on the same input tells you to set the Deck Input Selector to Line/Phono, which is right when you want to hear the record itself. Both are correct in their own context and they sit pages apart with nothing linking them. Get it the wrong way round with a control record on the platter and the control tone goes to the PA, so this is the first switch to check when a DVS deck is silent or screaming.
The Line and Phono selector for that deck still has to match the device, the Serato DJ Pro channel you control is fixed by which physical input the turntable or CD player is plugged into, and Numark tell CD player users to disable all the player’s built in effects including keylock and master tempo.
Each Deck Input Selector has two positions and no off: PC for the software channel, Line/Phono for the device on that deck’s input. PFL is pre fader, one Cue button cues that channel alone and both together cue both. Numark use deck and channel interchangeably for the same thing, sometimes in one sentence.
Absolute, relative and the mode the mixer picks for itself
In absolute mode the hot cues and loops are disabled, and Numark say so plainly: if you want to jump to a point in the song you have to use the needle. Relative mode keeps them, and Numark describe it as the mode that makes it possible to scratch a record while still using the hot cue and loop functions. If the pads have stopped responding on a DVS deck, check the mode before suspecting the pads.
If the control record or CD finishes before the track does, Numark state that the channel switches itself to internal mode, which they name Emergency Internal Mode, and switches back when the control signal returns. The music carries on playing while the platter controls nothing, and it is designed behaviour rather than a fault. Know where the control tone ends on your records.
Serato NoiseMap control records or control CDs have to be bought separately, and Numark say so twice. A control CD can also be burned from a file at serato.com/controlcd. Whether a DVS licence or expansion is needed on top of the control media is not stated: the guide addresses only the records and CDs.
The pads, the three modes and what is not there
Four pads per deck, eight in total, cycled by one Pad Mode button through three modes: Cue, Sample and Roll, with an indicator LED for the selected mode. There is no way to jump straight to a mode and no shifted fourth mode. Cue mode gives four hot cues from the hardware, and whether the pads can be banked to reach more is not stated. Sample mode triggers software sampler slots, assigned by holding Shift and pressing an unlit pad. Roll mode fires momentary loop rolls, shortest on the left, longest on the right, with the actual lengths set in the software.
There is no slicer, no saved loop mode, no manual loop mode, no auto loop pad mode and no Flip mode, and velocity sensitivity is never mentioned. Looping from the hardware is done with the Loop Knob rather than the pads, and the guide prints no pad chart and no beat divisions for the loop rolls.
So a routine on the SCRATCH is built on four cues a side and the Loop Knob, and anything more elaborate than that happens in the software rather than under your hands.
The Loop Knob, and the double press that loads both decks
The Loop Knob does four jobs. Pressing it activates an auto loop and pressing again deactivates it, turning it sets the loop length, Shift and turn scrolls the library, and Shift and press loads the highlighted track. Numark state that Shift with a quick double press loads that track to BOTH decks as instant doubles, including a deck that is playing, so be deliberate with Shift on this control during a set.
That last one is worth rehearsing away from an audience. On the SCRATCH the same control browses, loads and loops, and Shift is the only thing separating them.
One effect at a time, for the whole mixer
One effect at a time for the whole mixer. A Software FX button selects Echo, Delay, Flanger, Reverb, Version Echo or Phaser, per deck Effects Toggles then apply it to one or both decks, and a single FX Mix knob sets wet against dry for the unit. There is no second effect unit and no per deck wet and dry, so a delay on one deck and something else on the other is not available and turning the mix up affects both.
Choose the effect on the SCRATCH as a setting for the pair of decks rather than as a per deck decision, and expect the FX Mix knob to move both of them together.
The level figures, and the gap between the two masters
The XLR master is rated plus 20 dBu and the RCA master plus 6 dBV, quoted in two different units and roughly 16 dB apart. Feed a house system from the RCA outputs because the XLRs are in use and the amplifiers have to come up a long way, with the noise floor rising too. The booth shares the RCA block, so there is no separate booth figure.
The phono block gives a frequency response of RIAA curve, a signal to noise ratio and a THD figure, and stops. There is no maximum input level and no input impedance or cartridge loading for the phono inputs, on a product built for turntables, and the signal to noise row refers to a maximum input level the table never prints. If a high output cartridge distorts on Phono, this document will not say whether that is expected.
The appendix gives frequency response, signal to noise, THD plus N, maximum output level and output impedance for the XLR master, for the RCA master and booth together, and for the headphones, plus a line input block and a short phono block, all measured at 20 kHz bandwidth. It also gives USB 2.0 High Speed, converters at 24-bit and 48 kHz, a 32-bit fixed point DSP, ASIO and Windows Audio drivers for PC with UAC2 class compliance on Mac, and mains input as 120 or 240 VAC at 50 or 60 Hz, auto switching.
Connections and setup
What goes in, what comes out and where the microphone goes
One Line and Phono RCA pair per deck, two pairs in total, each with a Line and Phono selector and a phono grounding terminal, plus one mono microphone input on a combined XLR and 6.35 mm TS connector. The pair count is never written in words. Line inputs take up to plus 7.8 dBV into 47 kΩ. There is no aux input and no second microphone input.
A balanced XLR master, an unbalanced RCA master, an unbalanced RCA booth and headphones on 6.35 mm and 3.5 mm on the front panel. Numark state that the program mix goes to both master outputs. There is no balanced booth output, no independent booth mix described, no booth EQ and no split cue on this unit: the headphone controls are Cue Gain and Cue Mix.
Where the microphone goes is NOT STATED. The guide never says whether it reaches the master, the booth, the headphone cue or the USB stream, and describes no microphone on and off switch, no talkover and no ducking. The only controls are Mic Level and a single Mic Tone knob balancing bass and treble. The specification table has no microphone block at all, so there is no maximum input level, no impedance, no gain range and no phantom power statement: do not plug in a condenser assuming power is there.
On the SCRATCH that last point is worth testing at soundcheck rather than discovering during an announcement, because the document will not tell you where the microphone lands.
The power on order
Connect your input devices, then power the mixer on, then power on the amplifiers and loudspeakers. Numark print that order in the rear panel Power Switch entry, and the shutdown runs the other way: amplifiers and speakers off before the mixer. The power cable goes into the mixer while it is switched off and then into the outlet.
The SCRATCH has an internal supply, so the mains lead goes into the mixer while the switch is off and then into the wall, and the amplifiers come up last.
Crossfader calibration, and the document that carries it
There is no crossfader calibration procedure in this guide. No calibration mode, no button combination, no service utility and no pointer to one, in any of the five languages. The words calibrate and calibration appear in the document only in the Serato DJ Pro DVS section, where they mean calibrating the software to a turntable or CD player. Numark do publish a separate support article about calibrating the Scratch crossfader, and the guide never mentions that it exists, so an owner working from the manual alone has no way to learn there is a procedure. Anything about how that procedure runs has to be taken from the support article and credited to it, never to this guide.
The rule this site follows on the SCRATCH is a simple one. Any step that describes calibrating this crossfader is credited to Numark's support article, because that is the document that publishes it, and never to the user guide, which does not.
The calibration you do at every load in
Numark state that Serato DJ Pro has to be calibrated to the turntable or CD player every time the equipment is set up, and separately for each deck. It is done with music playing at set volume from the other channel, aiming at a readable signal close to 85 percent and an RPM reading of 0.0 with the record stopped. That is real load in time on every gig, so budget for it in the changeover rather than discovering it there.
Put it in the plan for the SCRATCH rather than in the changeover. Two decks means doing it twice, and each pass needs the other channel playing at set volume.
Firmware, drivers and manuals
Official downloads and documents
Go to Numark for the files themselves. We link their pages instead of hosting a copy, because a manual copied here is a snapshot of release day and theirs is the one that stays current.
Manuals. Official Numark manual page →
Broken link? Let us know and we'll fix it.
Frequently asked questions
What is it, and how is the name spelled?
A two channel Serato DJ Pro battle mixer with DVS. The guide never says so. The word mixer does not appear in the English text at all, nor do battle mixer, controller, two channel or 2 channel, and the channel count is never stated: it can only be read off the Channel Level Meters entry, which names meters 1 and 2. The introduction is a thank you for purchasing and nothing else. The nearest thing to a description is a capability claim, that Scratch is DVS enabled and allows a track in Serato DJ Pro to be controlled with a turntable or CD player connected to it.
The document spells the model Scratch with an initial capital and no article, as in Power on Scratch. The all caps form used in this site’s headings appears nowhere in the body text.
How big is it, and what does it draw?
The guide gives no dimensions, no weight and no power consumption in watts. The mains connector type and the round trip latency are not given either, and the number of audio channels the USB connection carries is not stated. The internal power supply is auto switching for 120 or 240 V, so touring abroad needs a mains lead for the territory rather than a converter.
What comes in the box?
The mixer, a power cable, a USB cable, a software download card, the User Guide and a separate Safety and Warranty manual. The power supply is internal, so there is no external adapter to lose, and Numark note that anything not on that list is sold separately.
Commonly paired with
What you usually find beside it in working booths, from club, festival and rental installs rather than from a manufacturer document.
Playing soon and it is not working?
Emergency Mode walks you through the checks in order, and it works with no signal once you have opened it.
Start Emergency ModeKeep the Emergency Card
We will email you the printable PDF so it is on your phone before the next dark booth. Occasional notes that save gigs. No spam, unsubscribe in one click.
Registering is free and counts everywhere on Save My Gig. We send a confirmation email first. Your address is stored with Brevo, our email provider. Unsubscribe any time. Privacy